Quantcast
Channel: davetaylorminiatures
Viewing all 414 articles
Browse latest View live

The New Mechanicus - A Review (part 3)

$
0
0

At the moment I'm working really hard to get a couple of Flames Of War commissions completed. Both US armies - one a tank company, the other a mechanized infantry army. Those new plastic infantry paint up beautifully, but are a pain in the but to clean mold lines on ; )

Anyway, here's part three of my feelings about the new Adepts Mechanicus fun from Games Workshop. This post? A look at the Sicarian boxed set. Although some felt I was basing on the Skitarii models, I was just suggesting I felt they could have been more unusual. Unusual like the Siciarians are. These models really fit with my thoughts/feelings on how the Skitarii could have looked, so it's cool that they're in the army : )

Like the previous two boxes, you can make two different units from the contents. Above you can see the Ruststalkers. I think these are my favorite of the two. The gasmask heads, spindly legs, and dual blades are reminiscent of some of the great John Blanche Femme Militant range. Also, the Princeps has a great deal of General Grievous going on, with his hooded cloak and additional limbs. I love the look of the transonic blades, so much so I'm going to work on converting a massive for one of the Knights I have waiting in the wings : )

There's also the chance that I might have to switch out their heads for Dark Eldar Wyche heads, so that I can have them look like my Thallax, Usurax, and Knight : )


The Sicarian Infiltrators are also cool. Not quite what I'd immediately think of as 40K, but as a concept sketch (dated 1993) that has been doing the rounds would attest, Jes Goodwin has been excited about this look for 22 years ; )

I think their method for "infiltrating" an enemy formation is great. Overwhelm the senses of the enemy through a variety of means, then stride right in and start poke the enemy with their taser goads. Very cool stuff. And speaking of taser goads, I'm loving the way they work in the game, as well as how they look on the models.

So, for the third of four boxed sets I think I'll have to give these guys an eight cogs out of ten score.

For another perspective on the AdMech releases, I'd urge you to check out KrautScientist's blog The Eternal Hunt, for his one part review of all the releases (along with some very cool links to other great modeling being done in the name of the Omnissiah).

And for a look at some great conversions using this Sicarian kit, head to here and here on the Officio Convertorum.

Cheers
Dave

And so it begins - NOCF 2015

$
0
0

Over the next few months I'll be ramping up the content here about the 2015 efforts for the NOVA Open Charitable Foundation Army Raffles.

This year we have five different armies/collections planned and underway. There are:
• Flames Of War - a Polish Army (including train).
• Malifaux - close to 70 models including a variety of Masters, meaning that this collection could be a great seed for a club about to get into Halifax.
• 40K - Novamarines, a massive collection is underway.

And the two armies that I'm involved in directing are based on a story by Gav Thorpe:
• Alaitoc Eldar
• Sons Of Orar Space Marines

As you might be able to guess, I'm painting up the drop pods for the Sons Of Orar force.


On Sunday it was nice enough (finally) to be able to sit out on my front porch so, while my wife worked in the garden and my daughters played on the sidewalk, I sat and clipped out all the parts for the three pods. There are a LOT of parts in this kit, and most of them are in multiples of five (which becomes fifteen across three kits!)


I takes a lot of scraping to clean the mold lines on all of those parts.

I'm thinking it might be of interest to do a bit of a "here's how I do drop pods" kind of tutorial. Would you be interested? Let me know if you would in the comments below.

And be ready for many more posts on this subject : )

Cheers
Dave

The New Mechanicus - Some progress...

$
0
0

So, I've managed to get start on my Adepts Mechanicus models. The first unit of Skitarii Rangers are pictured above. The overall aesthetic of these models has grown on me, but they are a bit of a bear to put together. The main flaw, in my opinion, being the difficulty you can have to rid yourself of the seams on the sides of the robes once the front and back halves are glued together. These bases are from Dragon Forge Design's Tech Deck range. But anyway, on to the show.


Here's my Ranger Alpha. I really love this head, so I used it instead of a hooded head. The taser goad is there because I love the rules, and the arc pistol is there to give him something that looks considerably different to the galvanic rifles of his squad.


The two Rangers above, give a pretty good idea of the amount of character these models do have, considering their reduced posability and covered faces.


This current squad has a Ranger with palm caliver and a transuranic arquebus (above). I'm planning on giving this squad three arquebuses (arquebii?), the second squad three calivers, and the third squad three arc rifles. The base is made from the box, with a layer of conversion bits, again from Dragon Forge Design's Tech Deck range (just scroll to the bottom of the linked page).


And finally, the first squad of Ruststalkers are under way. They'll all have glossy black faceplates, punctured by a single, glowing red eye. I've started painting one of these wonderful models, so I'll put up some photos soon.

Cheers
Dave

PS. A drop pod tutorial will be coming soon : )
PPS. If you need some 28mm scale skulls, check out Dragon Forge Design's new Kickstarter HERE. Only four days left to pledge.

This Is Not a Test! Launch code activated!

$
0
0

It has finally become a reality! Joey McGuire has been working on his own set of post-apocalypse skirmish rules (This Is Not a Test) for more than three years now. He has been diligently gaming and correcting, testing and tweaking his rules and slowly building up a nice set of miniatures to go along with them. Around this time last year I sat down with Joey and we chatted about the project, with me passing on some advice from my time in the gaming industry.

Shortly after, I was invited to take the photographs for his rulebook. Joey has amassed an incredible collection of miniatures and terrain over the years, so the photography was a delight. In one long day last June, we shot close to 300 photos ranging from individual miniature shots to complete table set-ups. That was a fun day - processing all those shots, not so much, but the results were well worth it.


At the beginning of this year, Joey invited me to do the layout for This Is Not a Test. He already had a lot of great artwork from various artists, the hundreds of photos from our shoot, and the rules completed. It was a simple thing to say yes, and after a couple of months work, going back and forth tightening and tweaking the look, Joey has finally been able to launch his 170-page set of rules and miniatures range.


The rules themselves owe a lot to the skirmish games of GW and others, but the have their own flavor too, so players can feel immediately familiar with certain mechanics, giving them the opportunity to explore the setting much more. With six different warbands to choose from (each with more than 10 different member types) there's something for everyone who loves the possibilities presented by a post-nuclear apocalyptic setting.


Check it all out at the World's End Publishing website, and keep up to date with all the latest news on his This Is Not a Test Facebook page. I hope you enjoy what you see. I know I've had a lot of fun helping Joey see his dream realized!

Cheers
Dave

The New Mechanicus - Ruststalker PIP

$
0
0

A little post to show the very cool Ruststalkers are underway. Initially I was going to fill in their recessed eye lens, but I ended up keeping it and simply shaving down and smoothing out the cluster of external lenses. I have a few more layers of gloss varnish on the faceplates to get them to match the other "black glass" faceplates in my collection.

Cheers
Dave

Vroom! Vroom! - Cracking open Car Wars.

$
0
0

With the imminent release of Mad Max: Fury Road hurtling towards us like a fuel-injected suicide machine, there has been a LOT of chatter amongst the various hobby/gaming groups I hang out with (in real life and online) about car-based post-apocalyptic action.

About a month ago, a friend in my regular Wednesday Night gaming group suggested that we give Car Wars 5th Edition a go, just as a fun break between the conclusion of our superheroes campaign and the start of our Malifaux campaign. We all chuckled, nodded our heads, and said "Sure, why not?"

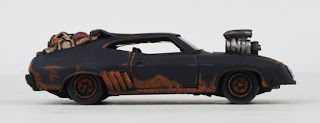
A few of us had played it before, some had spent countless hours "building" cars but never playing, and then there was me. I've never played it before, never read the rules or seen it in action. I have, however, always enjoyed the idea of doing insanely crazy things to cars and then racing them into each other - at least in a cinematic fashion. And so it was that when I was over at Thomas's on the weekend, I spotted a Matchbox VW Beetle amongst his extensive collection and asked if I could have it for the game. You see, I was deeply inspired by the crazy hunk of junk in the Mad Max: Fury Road promo pic at the top of this post, and I just had to make something that was close.


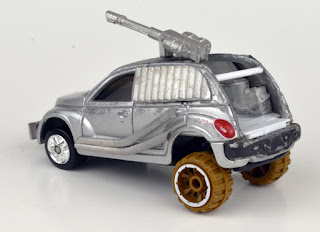
Here's the Beetle as it started out (well, this is the one from Eric's collection, but it is the same one I snagged from Thomas). It has the classic VW Beetle lines, but was sitting pretty high on the off-road wheels and frame.


That night I jumped straight into converting it. I pulled it apart, sawed off the hood of the Beetle, extended the frame (using a piece from the first GW plastic Rhino), and went to town on it all. The spike are cut from plastic strips and carefully glued one at a time to the roof. The "engine block" is one of the guns from the Adepts Mechanicus Onager Dunecrawler (I guess that one is getting the anti-aircraft load out) and various other GW plastic parts made it on to the model.


The mini-gun poking out the passenger side window is from a company called Stan Johansen Miniatures, a piece I also snagged from Thomas ; )


Painting the car was fun too. After priming it black I did a zenith spray with the Army Painter's Vermin Fur brown spray paint. It has a lot offering in the mix, so it gave a great basis for the rusty color of the car. The details were painted, I assembled the car, and then hit it with a few different weathering powders from Secret Weapon and Broken Toad.


Sure, it's not identical to the original from the film, but it certainly conveys a similar level of insanity ; )


Anyway, last night was the night for us to gather and go crazy! Thomas and Eric had each put together plenty of cars, enough for three cars each, as it turned out. We were also playing across an excellent table. Thomas had been monkeying around with some pre-existing images and had put together these excellent panels, printed out and glued to over 12' of foamcore. NOTE: as Thomas used some proprietary artwork, these files, images, or tables based on them will not be sold anywhere. No need to ask.

We played Car Wars 5th edition (as far as I know) and used the Division 15 (?) set of rules. The one where all the cars are Class 15 (or have had $15,000 spent on them, for those who know what that means). There are a ton of Car Wars products available on the Warehouse 23 website HERE, but this is the one we played with HERE.


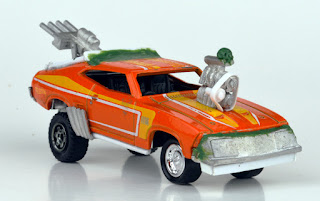
Marc also put together a very cool vehicle, based on an ice cream van, but sporting three mini-guns on the roof and a significant ram plate at the front - built as the Paladin from the pre-made cars. He went to town with the paintjob, using his signature blues and rusts, and painting up a new sign for it - Mr. Sprinkles.


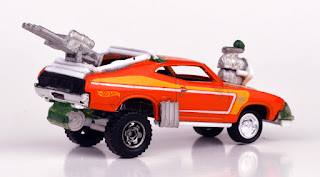
Here's a shot of Mr. Sprinkles being pursued by my car. Just to annoy Marc ; )


Thomas and Eric had both chosen an orange Mini Cooper to represent the Pure Energy car from the pre-made offerings.


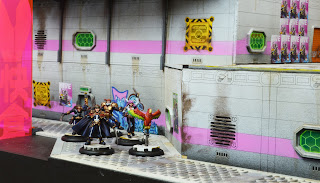
And here are a few of the cars in a set-up shot, before we started the game itself.


Rather than run the game as a race/chase/hunt we agreed to go head-to-head in a team fight, four cars per side. My team decided to split our forces into two pairs of cars so that we could try a pincer move on the other team that appeared to be going for group approach.

Thomas (on the opposing team) and I turned out to be the reckless daredevils, racing ahead of the packs and coming under a considerable amount of fire. I had taken three significant hits to my front armor by the time the end of turn three rolled around, and sadly hadn't done too much damage myself. Also, by this point, our opponents had switched things up on us and switched up their approach. Leaving Thomas to barrel forward at 80mph (while on fire), the rest of the team closed on the stretch of tarmac ahead of Marc and me. The Mini Clubman in the photo above was using the Devastator profile, a small car with an anti-tank gun and almost double the amount of frontal armor than my car.


I thought I'd be able to sneak into the gap beside it and race past to ram Eric's Wyvern, but sadly I fell short. After taking a punishing hit to the front from the AT gun, Sean plowed the Mini into my car and although he didn't cause my car to "confetti", he did strip all the remaining front armor and plow through my guns, engine, driver and gunner! That was in the first phase of Turn 4. I had managed to make it past three seconds of "real time". As one joker quipped, I hadn't even made it through the opening credits ; )


Even with my car flipped, the game went on and the rest of my team managed to give a very good account of themselves. Marc's ice cream van was able to exact revenge by stripping the other half of the front armor from Sean's Devastator in a ramming action, while John and Mark combined to take out Eric's Wyvern. After blowing a hole in it's side armor, flamethrowers took care of the occupants.


As the game came to a close, Thomas managed to execute a bootleg turn just before his crew burned to a crisp. His car had been burning since the start of Turn 2.


With three cars out of action for our opponents, there was little more Hans could do, so his Piranha slunk away to fight another day.


The CAR-nage at the end. (the polyhedral dice and silver cubes you can see in the photos were what we used for debris counters during the game, there were a lot of them).

What a great time! Despite having never played Car Wars before, and not reading the rules this time around either, I was able to pick up the game very quickly and had a ton of fun. I can heartily recommend it.

We all enjoyed it so much we'll be pushing back the start of the Malifaux gaming to fit in another round of Car Wars. Hopefully I'll have another car ready by then : )

Cheers
Dave


The New Mechanicus - Ruststalkers complete!

$
0
0

I finished these guys off over the weekend, but have only just been able to squeeze them under the lights. I'm pretty happy with them. Nothing too special, apart from the glossy faceplates, and the princeps has a grey cloak to match the clothing of my older minis. With all his red armor, I really wanted to avoid an overload of red.


In other news, my order from LooseCars.com arrived today in great shape. These cars will make their way into my Mad Max: Fury Road conversion collection, but more on that later.

Cheers
Dave

Vroom, vroom! - more Fury Road conversion work!

$
0
0

Well, there has been a bit of a frenzy locally (and on my little corner of the Interwebz) over the awesomeness that was Mad Max: Fury Road! Although everything in it was great, the general hobby focus has been on converting more cars for games of Car Wars (or Dark Future, or Devils Run, etc etc). I have now spent roughly $80 in 20+ cars, some to become donor cars, others to be the heart of a conversion inspired by the excellent vehicles in the movie.

After my last conversion (seen here), I wanted something a little simpler, so I went for the Chevy Corvette Stingray here. I tracked it down on a cool site called LooseCars.com. I also picked up a few other pieces I needed there and there'll be more conversions to come. Although it appeared that there had been an issue with my order, everything was sorted out incredibly swiftly, and my cars arrived very rapidly.


I don't have any WIP shots of this one, as it all happened in one night of frenzied cutting, gluing, and puttying. The changes made to this one are:

• strip cut from the hood of the car and the side fenders (it was too tough to try and cut it out and leave the fenders intact, easier to cut all the way through)
• rear wheels replaced from donor car
• rear body lifted up to accommodate the wheels
• engine cut from donor car and jammed into open engine compartment
• exhausts cut from plastic rod, bet to shape, and glued in place
• small pieces of plasticard cut to fill the gap at the fenders
• brownstuff used to putty in the body shape and fill the newly angled gap at the rear of the side panel
• plasticard and brownstuff used to create seat bolted to trunk
• plasticard and plastic rod used to created drum-fed .50 cal machine gun


When it came time to paint the car, I was all ready to paint it in the polished steel look seen on so many of the MM:FR cars (including the photo at the top of this post that inspired the build) but when I took a look at a video about a lot of the cars, there were a few shots of this car in a "black primer over red" paint job, so I went with that instead.


And here is is next to my original car : )

I'm still uncertain about the paint scheme, so sound off in the comments section and let me know what you think! Which would you prefer to see - as is, or polished steel?

Cheers
Dave

So...the Mars Pattern Warlord Titan...

$
0
0

Photo by Rictus from Recalcitrant Daze

Should I get one? Would you all be interested in me doing a series of videos (my first ever) about putting it together and painting it?

Oh my goodness! What am I saying?

A surprise from Blight Wheel!

$
0
0

Last week I received a surprise package from Blight Wheel Miniatures (a cool European outfit that I've mentioned a few times before). Laurent had sent me a copy of his brand new (currently-titled) Military Truck - a six-wheeled flatbed transporter that is based very much on the conversion I did many years ago. It was also sculpted by another friend of mine, which is very cool. I haven't had a chance to put it together (the painted version above is from the Blight Wheel blog post, here).


Laurent also sent me a couple of surprise pieces (seen below). Two sprues with torsos - all ten torsos in rough and ready armor plates with various icons of allegiance attached.


And a sprue of five heads on various helmets and mempo masks, with optional horns.


I couldn't resit putting at least one guy together, combining a head and torso from the batch with a set of arms and legs from Victoria Miniatures. Without the arms (above) to see the breastplate.


And with the arms to see it all ready to go.


He's finished off with a backpack and rebreather hose from Dragon Forge Design - I sculpted those backpacks!

I hope you like the potential of these kits - get out there and support your favorite manufacturers of cool stuff : )

Vroom! Vroom! - The last of the V8 Interceptors

$
0
0

And here's the next in my series of Mad Max:Fury Road vehicles for our Car Wars gaming. This one is the classic V8 Interceptor, beaten to hell, that sees less than three minutes of screen time in the film.

If you want to have a good read about the history of the Interceptor, from the first film through to the latest, I recommend you check this Mad Max Wiki out.


Fortunately. Hot Wheels released a 1973 Ford XB Falcon as recently as 2012. They currently go for $3-5 singly on eBay, or can be found in batches of six from $10-20. I picked up a pack of six in this lovely orange. Over the coming months I'll convert a variety of versions of this most classic of cars : )


Anyway, I tried to hit the key elements used to change the stock XB into the Interceptor for the start of Fury Road.

The stowage is pretty specific, one of the two tanks from the start of Mad Max 2 is still present, the rest of the space filled with four different kinds of fuel-carrying receptacles nestled in a dirty tarp.


The front end was originally a nose cone addition that could be bought for the princely sum of $216 (back in 1979). By the time it makes it to Fury Road, it only has the top half.


I made a pair of slightly exaggerated exhausts, and a super-charger with air scoop for the hood. Yes, this one sits a lot higher than it does on the actual car, but it felt good when I was making it.


And here's the first part of the paintjob, I just have to track down my box of weathering powders to hit it (and the Stingray) with some wasteland dust.


I hope you like it : )

So, I hear you are after some tanks...

$
0
0

As has been the story for the first half of the year, I've been incredibly busy with work during May. It shows no sign of slowing over the summer either. Sounds like a good problem to have : ) The only thing is that it does impact the rhythm of there blog, and for that I apologize.

Anyway, I thought I'd show you all the American Tank Company for Flames of War that I painted in April for a client. I learned quite a few things last year when working on this Armored Recon Force that I was able to apply to these tanks.

Above are the command tanks (Abrams is on the left). Below are the tank platoons, with a mix of different Sherman variants and Chaffees.


Here's the artillery support in the form of a battery of Priests.


The anti-tank support.


And a couple of objectives.


Finally, a tank I had never seen before - the T28 Super Heavy. This massive tank was initially designed as a breakthrough tank that could smash the Siegfried Line in Europe. After a conference in March 1944, five of the tanks were ordered. They were not ready by VE-Day and American commanders considered they might be handy in the planned invasion of the Japanese mainland. Only two prototypes were ever made, and one of them burned up during testing. The only surviving prototype is in now apparently at Fort Benning, Georgia.

My client likes to play around with various "what if?" situations, so wanted one of these cool models (from Heer46) to round out his collection.


I hope you like them : )

Cheers
Dave

NOCF 2015 - Drop Pod tutorial!

$
0
0

A little while back I posted about assembling some Drop Pods for one of this year's NOVA Open Charitable Foundation Charity Raffle armies - The Sons Of Orar Space Marines, to be exact. At the time I asked if anyone would be interested in a walk-through of my build and paint. There were a few who expressed interest, so here we are : )

After going through and cleaning all the parts for three Drop Pods, I started to create the sub-assemblies. You can see them above. They basically breakdown to:

• Engine and stormbolter
• Center console and harnesses
• Base and doors
• Five fins


Here's what it all looks like when three sets of sub-assemblies are gathered in a pile. After this, all parts (except the fins) were primed black. More on the fins later.


The bases, engines, and consoles were all heavily dry brushed with VGC Tinny Tin.


Everything was then dry brushed with AP Gun Metal.


I then washed the parts with my "super secret wash".


And drybrushed everything with VMA Aluminium.


I flipped over the base and repainted the armor panels black...


...and then masked off the engine base.


I sprayed the tips of the doors with Mephiston Red  (not pictured) and then I used a custom cut mask/sheet of styrene, and sprayed the rest of each door.


Here's a shot of the doors before removing the masking tape.


I then painted the edges of edge internal door with Averland Sunset (shaded with Skrag Brown).


These hazard stripes were hand painted - nine per side, 90 per Pod, 270 in all.


Back to the fins. I primed them white, shaded then with some Mechanics Grey, painted the panels black, masked them off and finally sprayed them with Mephiston Red.


After some detailing on the parts, here's a look at a set ready for assembly.


On each of the center consoles I painted a silhouette of an Eldar Craftworld, with three glowing points representing the three Drop Pods.


They Pods were then assembled; glue the consoles to the base then one fin in place; glue the engine to the fin then glue the remaining fins in place.


I then gave the Drop Pods a healthy dose of chipping and weathering.


And here they are. All ready to deliver Sons Of Orar directly to the heart of the Alaitoc Craftworld.

In the coming days we'll finally have photos of two of the NOCF Charity Raffle armies ready to go up online. When we do I'll be shouting it from the rooftops! : )

Cheers
Dave

New Dragon Forge Kickstarter!

$
0
0

As many of you might know, my Mechanicum/Adeptus Mechanicus forces all stand tall on the wonderful Tech Deck bases from Dragon Forge Design. I've been using these bases for three years or so now and love them dearly. Jeff has, after much pleading, finally sculpted some great new bases for the line that he is now releasing as part of his latest Kickstarter (launched this morning, if I'm not mistaken). He asked me to paint up some examples, and here they are : )


50mm rounds


60mm ovals (perfect for Skittarii snipers)


75mm oval - One


75mm oval - Two


75mm oval - Three


80mm round


105mm oval - One (perfect for Ironstriders)


105mm oval - Two (perfect for Ironstriders)


120mm oval


130mm round (perfect for Dunecrawlers)


The second Knight base in the series.

So head on over to the Kickstarter and support a small business : )

Cheers
Dave

Geek Nation Tours - Battlefields of Waterloo 2015 tour!

$
0
0

Well, if I haven't told you about it before, I can tell you about it now....

I'm currently enjoying the awesomeness that is the Geek Nation Tours - Battlefields of Waterloo tour (celebrating the 200th Anniversary of the battle today, actually). We've done soooooo much in the last three days that I'm struggling to keep up. We've visited many important campaign sites, including Ligny, Quatre Bras, Genappe, Le Caillou, La Haye Sainte, the Allied line, Papelotte, and Plancenoit. We've also visited a few other sites not connected directly to the campaign, such as the Cantillon Brewery, the Lion's Mound, the Panorama, and the brand new Waterloo 2015 museum.


Additionally, I presented two painting classes on Tuesday, thanks to support from Warlord Games and The Army Painter!

So, it has been a lot of fun, with a few more days to go. I just hope I can keep up with it all!

Cheers
Dave

PS. I'll be putting together a full report on the tour for Wargames Illustrated once I return stateside : )

Well, I'm back...

$
0
0
Back from my trip to Europe to celebrate my 10-year wedding anniversary. I have loads of cool photos to share for various reasons, and will do so in the coming weeks.

Today, however, I wanted to highlight the first two armies completed for NOVA Open Charitable Foundation's 2015 Charity Army Raffles! These two armies are being collectively referred to as The Battle for the Craftworld - the Sons Of Orar Space Marines and the Alaitoc Eldar.

TICKETS GO ON SALE THIS WEDNESDAY, JULY 1! PLEASE HEAD TO THIS LINK ON WEDNESDAY TO BUY YOUR TICKETS:

Small, composite photos are shown here:


And we've been showing off more detailed photos of the various elements of the armies over on the NOCF blog. You can check out all of our posts on them via these links:

Introductory post - HERE

First look at the Sons Of Orar - HERE

First look at the Alaitoc Eldar - HERE

Feature: Sons Of Orar Heavy Support One - HERE

Feature: Alaitoc Eldar Heavy Support One - HERE

Feature: Reminder about raffle tickets and Sons Of Orar Troops One - HERE

Last year we raised in the vicinity of $10,000 for various charities including: Doctors Without Borders, The Wounded Warrior Project, and Fischer House. This year we'd like to raise even more for these great charities, so please get behind us by:

• Buying tickets in the various raffles.
• Telling ALL of your wargaming friends to buy tickets.
• Spreading the word about what we are trying to achieve. 

Thank you all for your time : )

And our thanks to our sponsors who contributed to this project. 
Please support them, so that they can continue to support us!


Cheers
Dave

Do you remember when...

$
0
0
...I was working on my Imperial Knights?


I worked on some "custom decals" for my 30K version of the House Taranis iconography. These were pretty darn cool. A huge thank you to my friend Chris for tackling the printing of these for me.

There was only one real let down with the decals I had made. They didn't have white areas on them. Basically, if I wanted white, I'd have to paint over the decals once they were applied (or very carefully paint the white on the surface and apply the decals over it).

Well, those days are no more, because a long-time friend of the blog - Ron Gamble/Eye of Error - has launched a Kickstarter to create a business that can provide YOU (and me) with custom decals that INCLUDE WHITE!!!

I invite you all to head on over to his Kickstarter (HERE) that is almost funded, and get in early on the action!


Cheers
Dave

Vroom! Vroom! - Vehicle Conversion Parts are now available!!!

$
0
0
Shortly after we started messing around with Car Wars (and I went off on my Fury Road tangent), I was contacted by Lon Weiss from Brigade Games. He asked me to sculpt up a bunch of weapon and armor options for folks to add to their Hot Wheels/Matchbox cars. I was quite excited about it all, as you can imagine : )


Well, the first shots of the sprue arrived on my doorstep the other day. I was quite excited to get them out and onto the workbench. Above you can see the weapons (and weapons-related) sprues. I tried to go for a nice mix of weapons based on both the Car Wars options and a few that would allow/encourage an homage to the Mad Max films. I didn't want to go exclusively "Mad Max" in the look of the weapons, but wanted a heavy "Deathrace" vibe too.

From left to right, top to bottom, we have:

• 3 mini-gun style weapons with drum magazines.
• 3 .50 cal style machine guns with belt-feed ammo boxes.
• 4 rockets and 1 paint/oil sprayer.
• 2 flamethrowers and 1 arrow-launcher (based on Mad Max 2/Road Warrior).
• 7 yokes - these can be attached to any part of a car/truck and accept any of the weapons.
• 1 harpoon launcher, 1 laser gun, 1 sonic gun, and 1 mine dropper.
• 1 two-weapon turret and 2 one-weapon turrets - these accept any of the weapons.


And here are the armor and accessory sprues. Again, there's not a complete "Mad Max" feel, but a blend with "Deathrace" and other movies of the genre.

From left to right, top to bottom, we have:

• 4 wheel armor plates and 1 hood/roof plate.
• 6 armor plates plates - 4 designed for the sides and side windows, 2 designed for the windscreen.
• 4 larger armor plates - for where ever you'd like.
• 2 pairs of exhausts and 1 supercharger.
• 2 heavy ramplates.
• 2 light ramplates and 2 pieces of heavy rear armor plating.
• The Interceptor kit: stowage, exhausts, nose cone, supercharger - these can be used to make your very own "last of the V8 Interceptors" (as seen at the start of MM:FR).

You can pick and choose the sprues you want direct from the Brigade Games webstore.

Here are a couple of pursuit cars I made up yesterday from the parts. The first is my conversion of the PT Cruiser sent to me by my friend Nathan. Yes, it used to look just like my real-life car.


Parts used: flamethrower, twin-pipe exhausts, side armor plates, light ramplate, and stowage.


The second car I HAD to make was the re-fitted version of Max's Interceptor ridden by War Boys from MM:FR.


I used the parts from the Interceptor kit (except the stowage), added a second supercharger on top of the first, glued the mine dropper under the rear and puttied it in as a fuel tank, and then added the arrow launcher to the rear. The launcher doesn't look exactly like the one used in Fury Road, but I like the look and the nostalgic connection to MM2. I added a strip of plasticard to the underside of the nose cone, and sculpted a tiny skull atop the superchargers : )


And finally a look back at the MM:FR Interceptor you can make from the Brigade Games kit (plus a Ford XB Falcon from Hot Wheels).

Cheers
Dave

Vroom! Vroom! - finally, more cars are rolling!

$
0
0

After my last post (HERE), I was pretty excited about building and painting little cars again. Here's the painted version of my modern day ride, the Flammencruizer!


I painted the whole car in the polished silver first, and then added the rusty patches and rusty flames.


And at the same time I painted up the silver Interceptor, known to the Fury Road production crew as Razor Cola. I think it turned out pretty nicely. Once I've decided how I want to do the spike droppers I'll add those to the rear.


Having a handful of the parts I sculpted for Brigade Games on hand, all I had to do was trawl through my box of loose cars and pick out a few to glue stuff on. As I wanted some quick progress, I chose these two "Jurassic World" vehicles to get the minimal activity treatment. No cutting, drilling, or grinding, just gluing. The one on the left already has a very interesting profile; lots of lumps, bumps, and random stowage. The one on the right felt like a really solid beast, so it got the heavy ramplate, and armor plates all round. Both received machine guns, the one on the left a .50-cal style, the right a mini-gun style.


And I glued a harpoon launcher and a flamer onto my monster truck, my take on Bigfoot.

Until next time!

Cheers
Dave

Why so quiet?

$
0
0

Well, I've been hard at work wrapping up the display/demo table for Relic Knights that will make its debut at GenCon next week. I talked a lot with John Cadice (Creative Director at Ninja Division) and we decided on a lovely mix of bubblegum pop and edgy grunge - imagine a Cerci hab-district assembled from pre-fab components fifty years ago, and then left to decay, with inhabitants that don't really give a damn about upkeep. Unsavory characters have moved in and the area has drawn some Star Nebula Corsairs, ready to plunder.


I then went to work with Alex Landing from Ironheart Artisans, designing the pre-fab parts that would make up the district, and generally looking for ways to add layers of detail and character to the board. It's taken a while to get it to this point, including quite a few late nights (cutting into my regular hobby time).


I hope you like these pics. I'll post a few more teasers on the Dave Taylor Miniatures FB page over the next week, but if you'd like to see it in person be sure to head to Booth 1943 at GenCon to check it (and the game of Relic Knights) out.

Cheers
Dave
Viewing all 414 articles
Browse latest View live