Quantcast
Channel: davetaylorminiatures
Viewing all 414 articles
Browse latest View live

Question? I have questions!

$
0
0
I have three questions that I need help with. I hope all you good folks out there might know the answers (or know someone who does).


The first question is for the Horus Heresy devotees in the audience who already have a copy of the FW book Betrayal. I bought three packs of the Mechanicum Thallax Cohort at Adepticon, and one in three can be equipped with a "special" weapon of sorts. I've assembled six of the Thallax with their lightning guns, which three special weapons should I equip my last pack with (yes, conversion/creation work will be required.

Another Horus Heresy question. Which scenes in the Horus heresy novels best describe the Warsingers that the Space Marines face in the Istvaan system? I'm hoping to knock together a quick diorama for Games Day.


And finally, can any of you wonderful people point me in the direction of any conversions where people have opened up a Tau Crisis suit to reveal the pilot? I'm looking to do a similar conversion for a Riptide very soon.

Cheers
Dave

PS. PLease note: all the images in this post are from the GW and FW websites and are used without permission.

What was old is new again!

$
0
0

I haven't been idle, hobby-wise, since Adepticon. I've just been without my lights for photography. They returned on Wednesday, so last night I was able to sneak in a few shots of what I've been up to.


So far you've only really seen the "new" stuff for the Mechanicum army. Well, part of the plan has always been to rebase and touch up the "old" stuff, and bring it inline with my new approach. Above you can see the four Magos/Adepts models from the "never commercially released" Adeptus Mechanicus set that was available for a short time in the early years of this century (vis GW's Skullz program). When I first tackled the AdMech in 2005-6, I converted these guys, and replaced a few missing bits, hence the interesting mix of backpacks and claws etc.

For this update I simply switched their bases, updated their skin color to match the pallid flesh aesthetic I'm going for now, and repainted any military green areas with black or red. They'll be a nice "throwback" cluster of models in the greater procession.


I have over 30 servitors to update as well. Here you can see the new approach to the flesh in effect. The model on the left is my original "greying flesh", then the second step of the new flesh (Vallejo Pale Sand with a layer of Seraphim Sepia wash), followed by the fourth step of the new flesh (highlights with Pale Sand and Dead White). The final scribe servitor on the right has some thin, spot glazes of Secret Weapon Ruby wash pushed into the details.


Here are a couple more of the updated servitors on their Dragon Forge Tech Deck bases.


I also had over 20 "Cultists" to bring up to date. Here they are. The bulk of the original conversions are based on the old Bretonnian Grail Pilgrims.


And finally. I was short a couple of 40mm bases (a miscalculation on my part), so I built these ones using plasticard, plastic rods, and a few cool vents and deck sheeting that I received from Jeff (at Dragon Forge) in my order. I think they've turned out very nicely.

Anyway, I hope you enjoy seeing this "update". There'll be a lot more Mechanicum/Adeptus Mechanicus stuff to come.

But, wait... there's more!

My mate Graham McNeill, author of Priests of Mars (the book that rekindled my obsession for the Ad Mech), is up for voting in the SFX awards for 2013. Please take a few minutes to head to this link here, scroll down a bit, and vote for Priests of Mars. I (and Graham) would really appreciate it ; )

Cheers
Dave

The first of the Thallax Cohorts

$
0
0

Here are the first three of the new, Forgeworld Mechanicum Thallax Cohorts.


I went for a fairly simple color scheme, much like the FW paintjob, but a little brighter on the brassy bits.


I decided not to go for a bright blue glowing power core, but I might change that if enough of you think otherwise. Also, for the face plate I decided to steal a little bit from Roman Lappat's class. On of the busts he has painted features deep black eyes, accentuated by four or five layers of gloss varnish. I think it adds just the right touch of depth to the head.

Cheers
Dave

Is it time to fight?

$
0
0

Over the weekend I picked up some Vampire Counts Vargheists from my FLGS (Dropzone Games) and set to work adding some techno bitz, most of them from the Dark Eldar Talos kit. With a few sessions of greenstuff application I ended up with these three 'Chrono Gladiators'.


These three beasts have just been primed (white) and stand ready for me to dive in with the paints. I'm pretty excited about them, so they may push aside the servitors currently getting a makeover.

Some of you may have noticed the small, circular sockets embedded in the flesh of these combat servitors, somewhat reminiscent of the sockets from The Matrix. I thought I'd boost the value of this post by showing you how I did them.


Greenstuff and a sculpting tool are required, in addition to two "new" tools, shown above. A is a thick plastic rod with one end drilled out to create a little hollow inside. B is a thin plastic rod with a diameter smaller than the hole drilled inside the thick rod.


Step 1. Place your little ball of greenstuff onto the model where you want the socket.

Step 2. Smooth out the ball of greenstuff, blending it into the surrounding flesh.

Step 3. Push the end of Tool A into the center of your greenstuff bulge.

Step 4. Push the end of Tool B into the center of the greenstuff nubbin.

Step 5. Let it all dry

Simple, really. And don't forget to use some sort of lubricant on all your tools when working with greenstuff. I use my paint water because it's convenient ; )

Cheers
Dave

Public Service Announcement #1

$
0
0

My friend, Justin McCoy (of Secret Weapon Miniatures), is just about to wrap up his company's first Kickstarter campaign, Tablescapes. I've mentioned it before, but as there are now less than 48 hours to get your pledges in, I felt it was important to mention it again.

Since I last talked about it, several more themes have been unlocked, and all manner of additional announcements and partnerships have been made.

Soooooooo...   Head on over to the Kickstarter page HERE and take another look through the excellence that is Tablescapes!

Cheers
Dave

Expect to see a few more plugs for different things over the coming days.

Public Service Announcememt #2

$
0
0

My buddy Alex, owner of Battleroad Games & Hobbies, is celebrating his 30th birthday in a few days (May 14th to be exact). To do it in true Alex style, he'll be running a "30% off for 30 hours" sale in his webstore starting on May 14th (this Tuesday).

Alex has a ton of cool things in his store, including a lot of GW bitz, soooo... I suggest you click on the link HERE and start planning your purchases for Tuesday!

The discount code is: 30thBday

Have fun, updated Mechanicum combat servitors coming very soon!

Cheers
Dave

More bestial, not less...

$
0
0

Last week's post on the Chrono Gladiators received quite a bit of feedback (which I always enjoy) and not all of it positive (which can be helpful if phrased correctly). I took a bunch of this feedback into account, modified the models a little (despite their already primed status) and got stuck into painting them.


The biggest fear some folks had was that they were looking too Dark Eldar and not enough Mechanicum. I'm not sure if I've been able to redeem them in the eyes of these folks, but I'm happy with the results, so I guess that's the main thing ; )

One comment was that the legs looked a little too bestial, and I agree that it was the legs/feet that were causing some of the issue. I stepped back and thought a little about the influence behind much of this army - the crazy work of John Blanche. Then it hit me.

These legs weren't too bestial, they weren't bestial enough! The model was heavily "wolf" influenced, so I decided to take a suggestion from commenter Mkvenner and add hooves into the mix. And not just horse hooves, but crazy, metallic hoof collars for the bottom end of the leg. There's an interesting kind of "fetish" look to them, something that makes the model feel awkward and unnatural - voila! John Blanche inspires again.


Here's a size comparison shot of the tallest and shortest of the bunch along with the Plasma Cannon servitor and the Thallax.


I trimmed off some of the pointy bits on the faceplate too, filled in the holes with putty, filed it down once dry, and added a couple of plasticard squares on the sides, to mimic the Thallax faceplate. The painting of the faceplate was achieved in the same manner.

And here are the three of them ready to join the Mechanicum horde!


I hope they worked out and that you like them as much as I do.

As always with this army, the bases are from Dragon Forge Design.

Cheers
Dave

Public Service Announcement #3

$
0
0

Man, are May and June busy months, or what?

First up, I need to remind everyone who can make it out, that the Dropzone Games One Year Birthday party is fast approaching! On the weekend of 7-9 June, Tom, Dan, Terry and the guys will be hosting another massive shindig at the best FLGS on the East Coast! Click on the link to find out more about the fun they have planned.

I wish I could be there, but work commitments are dragging me across the country to another big wargaming event - WarGames Con! This will be my third time attending this excellent event in Austin, TX, and run by none other than Jon Wolf!


Make sure you're at one event or the other (or that you at least get to do some painting that weekend), as I know I'll be having fun photographing toy soldiers for Wargames Illustrated! : )

Cheers
Dave

Volsinii Imperator of Knight Household Etruia

$
0
0

The latest addition to the Mechanicum army is this construct. Hailing from Knight Household Etruia, this is VolsiniiImperator, piloted by Lucius Sejanus.

Quite obviously he's built from a Grey Knight Dreadknight, but with a few modifications. The most fun was curving the front plate for the cabin that holds Lucius Sejanus, that and smoothing out the putty for the top of the cabin.


I've repeated the cog/crenellation motif several times on the larger pieces of armor, should add just the right level of detail once painted.


The shock lance was fun to cobble together, and that AM symbol is from a FW titan ; )


This was the third ammo feed I had to build for the chaingun. It's not perfect by any means, but I'm satisfied right now.


Lots of detail around the back of the model too.

I hope you like it. : )

Cheers
Dave

And the clock is ticking...

$
0
0

With less than six weeks until the in-store Armies On Parade event, I figured it was time to get cracking on the display board. Much like last year, I'm planning on a processional feel to the army presentation. There will also be a few surprises I hope will be appreciated by everyone viewing the army : )


So, over the next six weeks I have to paint my Knight, my Admekrepairrume, 20 Bridge Guards, build and paint the display base, attend both Kublacon and WarGamesCon, host my parents for 10 days, and celebrate my 40th birthday and my 8th wedding anniversary! Should be a busy time ; )

Question: I'm painting the armor on my Knight in a Brassy/Bronze way, highlights quite bright and shiny, shadows very dark and grimy. How do you think I should paint the "steel" parts of the model, bright and shiny OR predominantly dark with bright edge highlights?

Cheers
Dave

We are Legion...

$
0
0

I've finished off the updates on my old servitor horde. They all have their new sickly, pallid flesh, brassy bits with patina, and awesome Dragon Forge Tech-Deck bases. There are 35 of the suckers in the picture above, along with two Techpriest Engineseers to oversee them.


A I was going through and touching them all up I realized that no two are identical. They are built from a pretty even mix of the eight different bodies that have appeared over the years (shown in the photos above) but have been given enough arm swaps that they are all different. This pleases me : )  The ninth body in the photo just above is one of the old Skullz promo set of Ad Mech guys.


Here's where I'm at with the painting on the Knight. All the armor plates are close to where I want them, and the rest of the metallics have been painted with Boltgun Metal and washed with subsequent layers of Secret Weapon Amethyst, Agrax Earthshade, and Nuln Oil. It certainly is quite dark.

Off to the San Francisco Bay Area today to attend Kublacon, should be fun. I might even enter their painting competition ; )

Cheers
Dave

Wastrel or "wasting my time"?

$
0
0

So, do you think I should enter this guy in the painting competition at Kublacon today?

Cheers
Dave

KublaCon and some more PSAs : )

$
0
0

Well, I finally had the chance to get out to the West Coast (the Bay Area to be more precise) to check out the KublaCon show (tagline: The Khan of Cons!)

I was there to cover the first Flames Of War US West Coast Nationals tournament, run by Gamescape North in conjunction with Battlefront. The tournament was great; well-run, friendly gamers, some very lovely looking armies, and a very relaxed atmosphere. There'll be photos going up soon on the Flames Of War website, and appearing later in the year in the pages of Wargames Illustrated.

While I was there, I had the opportunity to enter into the KublaCon Miniature Painting Competition, run by Wayne Rogers. It was a very interesting departure from the "normal" format of mini painting comps that I'm used to. Instead of it being the "podium" format with a wide variety of categories (eg. 10 categories with a 1st, 2nd, and 3rd awarded in each, just like the Golden Demons or Crystal Brush) it was what is known in the wider painting world as an "open" format of judging.

Essentially there were three categories:
• KublaKids
• Open
• Masterclass

You could bring along up to two "single minis", one "squad", one "large", and one "diorama"

Each of your pieces was then judges to a set standard by a panel of judges (I think as many as five, with results being averaged) and determined to be either gold standard, silver standard, bronze standard, or honorable mention.

If you entered your work in either the KublaKids or the Open categories, you were awarded a Kubla Medal for each piece, determined by the quality as judged by the panel.

If you entered in the Masterclass category, all of your pieces were judged, given their "level" and the highest ranking piece was what was awarded the appropriate trophy.

As I was traveling all that way, I figured I'd take all the entries I could, and put them up for consideration in the Masterclass category. I brought the following entries:

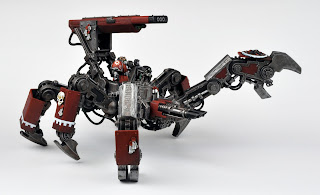
• Iconoclave diorama - considered Bronze
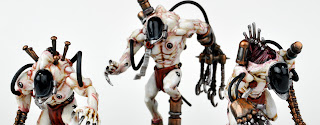
• Lamenters Tactical Squad - considered Bronze
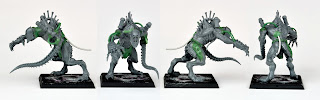
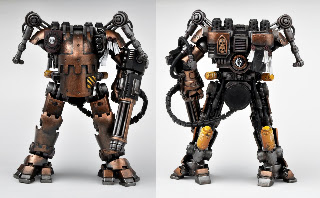
• AdMech Combat Servitor - considered Bronze
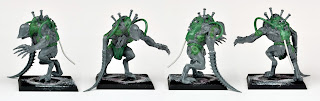
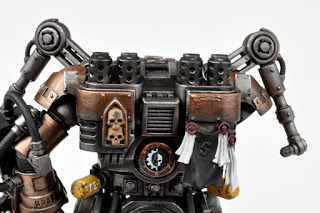
• Lamenters Dreadnought - considered Silver
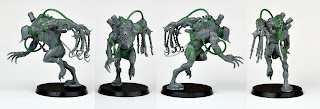
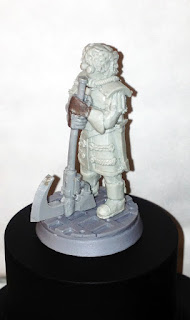
• Malifaux Wastrel - considered Silver

This last one was considered by best entry by the judges, and so it was that model that I was unsure about that won me the Silver Kubla bust in the first photo. Pretty pleased with that, and having seen the other Masterclass entries, I can now see what I need to do/work on to lift my game for next year. As there were already entries better than mine in the case when I entered, I knew the pressure for Best of Show was off completely, so I could think about some of the other awards, like...


Best Conversion!

Apparently the judges had to be told a number of times that my Combat Servitor entry was a conversion. Most of them had assumed it was a stock model, so I'm pretty pleased with that too ; )


There were plenty of other great things at the show (one of the being the very cool family atmosphere, as geeks of all ages (from 1 to 91) were at the event to indulge in a weekend of gaming (be it miniatures, board, card, or both kinds of roleplaying)!

One of the cool things that caught my eye (and will be featured in the pages of Wargames Illustrated sometime this year, I hope) was "Wooden Wars" by Thomas Foss. You can see the "press pack" that Thomas handed me at the show, with a set of rules, along with three packs of wooden "flats", toy soldiers cut from birch plywood with a laser, ready to be assembled, painted, and have little rubber balls bounced at them by kids of all ages as they advance across the floor... err, battlefield!

More on these at a later date as I get some of them painted up, but you can find out more about  Wooden Wars at his blog:

skullandcrown.blogspot.com

The first Public Service Announcement is about a new game store in Rancho Cucamonga, CA -
Dice Of War Games! Owned (in part) by my friend Alec Peters (of the Apocalypse 40K forums and blog fame), the store will open this weekend (June 1-2) and promises to rock your gaming world! Head on over to their Facebook page HERE to check them out : )


PSA #2 today is about a little Kickstarter being run by another mate, this time Rhys Knight from the UK. He and a couple of friends have formed PDC gaming and are running a Kickstarter (HERE) to raise funds for their "Toys for your Toys" range of wargaming accessories (including sprues of plastic weapons, tracked gun platforms, and other fun items). They are currently at 65% funding with 5 days to go. Head on over to their KS page (HERE) and check out their work!

Cheers
Dave 


Tutorial - Brassy Bronze

$
0
0

With my last WIP of my Knight, a couple of you were interested in how I'd done the brassy bronzey armor plates. Well, here's a quick recipe to get you started on your own tarnished/burnished combo.


Step 1: I used Vallejo's Tinny Tin as the base coat.

Step 2: Highlight with a mix of Tinny Tin and Vallejo Brassy Brass.

Step 3: Highlight with Brassy Brass.

Step 4: Begin shading with thinned wash of Vallejo Charred Brown mixed with a little Black.

Step 5: Continue shading by adding more Black.

Step 6: Once you are satisfied with the depth of your shading, take it one step further with a thin glaze mixed from two Secret Weapon washes - Storm Cloud and Algae.

Some of this may be a little tough to see in the color swatches above, but it works pretty much in that progression. Of course, feel free to add a few more "in between" steps if you feel the need.

I hope you have fun with it!


And I wasn't sure if I'd shown you the updated insectoid-walker for my army. It has previously sported green armor plates and has been used as a Defiler : )

Cheers
Dave

More WIP on the Knight

$
0
0

Here's the current state of play on my Knight. The brassy bronze is finished, the silver metallics are almost complete, and a number of the details are complete too.


While at Kublacon, I asked the opinion of a few painter friends and the answer to the "dark or bright" question was, not truly surprisingly, "Both". I've approached it all as another, slightly zenithal, thing. Imagining a stronger light source from above, my upwards-facing surfaces are bright silver, while the shadows are quite dark/matte. As you gone further down the model, the metallics become less bright, perhaps with only a thin, glinting edge here and there.


These last two shots show that idea a little more, but also show the soot-blackened exhaust pipes and the rivets picked out in shiny silver.

Back to the grind ; )

Cheers
Dave

Smooth lines and interesting textures

$
0
0

A little change of pace for you all today. I've never really been a "car guy". I mean, I appreciate them, but I've never felt the need to get an old car and spend hours tinkering away in a back shed somewhere. I have toy soldiers for that ; )

Having said all of that, my dad and my father-in-law are "car guys", so when my parents' visit from Australia intersected with the National Street Rod Association show in York, PA, last weekend, I tagged along to admire the conversion work that many enthusiastic "hobbyists" (yep, just like we toy soldier hobbyists) had put into their treasured cars.

Here are a bunch of photos I took of cars I liked the look of (or at least an element of), and some interesting paint jobs.


Above: I really liked the subtle color scheme of this old Ford


Above: I loved the solid lines of this great car.


Above and Below: Such a great way to preserve the paint in the state it was uncovered in a barn.


Above and Below: We also made a trip to the Smithsonian Air and Space Museum Annex, where I got to take a close up look at the Space Shuttle Discovery. I was amazed by the interesting texture on the shuttle itself. We're so used to seeing long distance shots of the shuttle, or smooth plastic kits, but the real shuttle is incredibly rough and "patchworked" in appearance. Very cool.


Above: And finally, here's an almost Orky hotrod with two V8s in series. Apparently you can run it with one engine, 
or engage both with some tricky engineering. Of course, with both running it chews through the gasoline!

Cheers
Dave

Volsinii Imperator - complete

$
0
0

Well, it took a little longer than I originally expected, but asking advice from various folks (you, my kind readers, included) have made for a piece all the better for it.

When last we spoke, I was uncertain about the "face" of the Knight and was contemplating an icon of some kind. Over the weekend I was in Austin for WarGamesCon and spoke with Mondel "GAR" Garcia, who sent me down a different track. We chatted about brightening up the front of the plate, and deepening the shadows to make it pop more. While most of the shading was done with thinned brown, black, and green, GAR suggested adding in some blue (the complimentary color of the "orange" brass). It certainly worked well and I'm pleased with the final results.

I hope you like them too. Enjoy the rest of the photos of Volsinii Imperator.


Cheers
Dave

The Bridge Guard have arrived!

$
0
0

Some of you may remember this post from April about my first sculpted figure... The Bridge Guard?

Well, today a package arrived from my friend Chris Borer (famed Slayer Sword winner and the guy behind Full Borer Miniatures). After he did such a great job on my casting last year, I managed to cajole Chris into casting up my dude for this year's Armies On Parade project : )

*squeeeeeeeeeeeeeeeeee*

Once again Chris managed to replicate all the flaws in my sculpting perfectly ; ) The brownstuff seen on the figure below is primarily to correct problems with my sculpting for the hands, a pretty crappy job really, but it's all about learning, right?


Anyway, I now have 20 of these to assemble and get primed.

Time is ticking!

Cheers
Dave

Bridge Guard - Now with 5% more paint!

$
0
0

And by 5% more, I mean that I have one out of 20 painted.

This past weekend was a very busy one, with it being Father's Day here in the US (and other countries too I hear). My two lovely daughters and my wife took me strawberry picking for the day! We managed to pick almost 20 pounds of strawberries in about an hour and spent the rest of the time running around, playing on slides, and having a leisurely lunch. When the girls were napping I had a chance to work on my display board, getting some of the details in place, but I still have a TON (or TONNE depending on where you are) of work to go on it. Photos of the board will be revealed after the in-store Armies On Parade event.

Anyway, I finished up this guy late last night. I hope you like him : )


Here are the other 19, all on their "painting bases" ready for their primer coat. The greenstuff on their gauntlets is to correct my atrocious sculpting on their hands. Next time the hands will be better, I promise!


And as a little added extra, I've put a few different pieces of kit on their backs. Some are plain, some get grenades, some canteens, others pouches etc.

Anyway, I must get back to it!

Cheers
Dave

Another teaser post

$
0
0

Just a quick post to show you there has been more progress on the display board for my Armies On Parade project. Here are a couple of lovely golden statues to stand atop the... ahem, never mind.

Please excuse the flash from my phone.


And here are the first eight Bridge Guard painted and standing on part of their... ahem, never mind. ; )

Cheers
Dave
Viewing all 414 articles
Browse latest View live